Wednesday, March 21, 2012

A Baby Blogger's Experience

When I first made my blog back in...I guess it was February of 2011, I posted a couple things, and then I got bored. Of course no one came and looked at what I had posted, because no one knew it even existed...and although I knew a lot of people blogged about all sorts of stuff....I didn't know how to search through the blogs to find people who had similar interests to me. I also thought that I didn't really have anything to say that would be of interest to anyone except myself.

So after posting a couple things...I left and forgot about blogging.

It wasn't until recently that I started posting again. I guess I don't even know what made me come back. Maybe I saw something online that brought me to someone's blog. I probably started reading comments from others, and visiting their blogs and reading their posts. I subscribed to some and read about all of the different things that they had made and how they were transforming their homes, and it started to get interesting.

Then one day, I saw a Link Party on someone's blog. Oh my...what is this all about? I was seeing little pictures of all kinds of interesting things...crafts, recipes, projects, etc. After following some links, I found other blogs that were really cool and interesting and full of things that I loved. As the days went by I saw more link parties on other blogs. After looking them over and reading the rules and getting a general idea how they worked, I decided to add one of my posts to one. So I did....and the next time I come back to look at my blog, I noticed that people were coming to visit me! 

So what is a Link Party?
A Link Party is when an author of a blog (the host) invites you to link up a post from your blog. You share the URL and a photo from your post and it is then added to a thumbnail gallery. The thumbnail gallery consists of everyone else's posts that they have shared. Once you have shared your link, other people can click on it to visit you, and you can in turn click on everyone's to see their posts.

In the past month or two, my stats have shown that I went from less then 100 page views to over 11,000....and it is all due to sharing what I blog about through link parties.  

Also, not only have the link parties increased traffic to my blog....but I have discovered so MANY talented, interesting people. I've learned about craft projects that I never would have thought of, recipes that I want to try, blogs that have inspired me to try furniture refinishing and even repainting my kitchen and redoing my cabinets. I've seen inside so many beautiful houses and gotten amazing ideas for home decor and organization.

So where do you find the link parties? Most of the ones I join I have just stumbled upon while browsing through people's blogs.
Below, in no particular order, are the awesome blogs that host weekly link parties that I have joined that have generated the most traffic for me. Click on the buttons to visit them.
Sew Many Ways     A Bowl Full of Lemons  

  DIY Show Off blog   Craft DIY Ideas Between Naps On the Porch

 Serenity Now blog  

Also, if you visit Where I Party, you will find a lot of other blog sites that host great link parties. I know there are other ways to increase traffic to your blog, but I really enjoy sharing my links at these parties, and being able to see all of the other things that people are blogging about. I know they are a lot of work, so I just want to take a minute to thank each host, if they are reading, for taking the time to host your parties, and for giving me a place to share with others.

A couple things to keep in mind when joining a link party:
1. Each party has it's own rules, regarding the number of posts you can add, or the kind of thing you can post, so make sure you read them before joining.
2. It's always nice to leave a comment and thank the person for hosting the party
3. Instead of just posting your link and leaving, stay for a while, and visit some of the other sites that are posted....there are some AMAZINGLY talented and interesting people out there blogging, so take some time and go check out their blog.
4. If you visit someone's blog, leave them a little love and post a comment. Everyone loves to get comments!
5. Always add a link back to the link party in each post that you share, whether it is a text link, or adding a blogger's button to your post. So each time you link to a party, you will need to go and edit your post to include the host's link. It is time consuming, but very important so that others can go and join the party.
 :)

I just want to state that I am NOT an expert at link parties...I've never even hosted one. I'm just sharing my opinions, my experiences and the little I have learned about them since I started 'partying'.  :)

It really does make a difference when you know people are taking the time to visit your blog. Even though not everyone leaves a comment, you know you just aren't .....typing into thin air, so to speak. Don't get me wrong...I love when someone leaves a comment on some little inexpensive crafty project I've done, it's like a pat on the back, or an 'atta girl' haha....and I always try to reply to each and every comment I get. Bottom line is...it's not all about getting attention or saying 'Hey, look at me!".....to me it's about sharing, and interacting with others, and knowing that even if I post about something silly like microwaving rice, or how much I love my vacuum, there's usually always someone who will be interested in what is going on in my little world. 

For a while I struggled with something to come up with to blog about. I didn't take on big expensive room remodeling jobs, or have the means to create elaborate tablescapes with fancy, expensive china, or the know-how to tear out my carpeting and lay a new hardwood floor. I don't grow award winning roses to expertly arrange in front of my window. I'm no where near a gourmet chef, so I can't post about cooking. So what do I write about? What will people want to read?

Then one day, on someone's blog, I don't remember who's.....they wrote:
"Don't know what to blog about? Blog about what you love."

So I do. And I'm having FUN doing it. Do I know all I need to know about blogging? Heck no. But by reading others blogs I have been learning little by little.


So in closing (this post ended up being a lot longer than I anticipated), I just want to say, I am in no way an expert in the blogging world. I'm a baby blogger....who almost gave up before I really got going. I guess I wrote this to not only thank the people who host all of the wonderful link parties, but for everyone who's blog I learned from, got inspired from, got encouragement from. And to in turn, give just a little advice to those who may just have started blogging.

So far, for me, this is turning into quite a lot of fun. :)


Linking to:


Pin It

Monday, March 19, 2012

Quick & Easy Chicken and Rice

I was looking for something quick to make for just myself one day, and came up with this quick, yummy lunch.

I had a boneless, skinless chicken breast in the refrigerator, so I took it and cut it into then strips, added a little butter to a pan and let it heat up. I also had a bag of Birds Eye Steamfresh white rice in the freezer, so I popped that into the microwave.


While the rice was steaming, I added my chicken to the pan, and while looking through my cabinet for something to season the chicken with, I found an envelope of Old El Paso Fajita seasoning mix. I sprinkled some of the seasoning over the chicken, added enough water to make a sauce, and simmered the chicken in it until it was done.


Then all I had to do was open the bag of rice, put it on the plate..add a tiny bit of butter, then poured the chicken and sauce over the rice. 

A quick, easy lunch for one....and was it ever yummy!

With a few more chicken breasts and rice, this would be a great dinner for the whole family.


Linking to:
{aka} design ~  A bowl full of lemonsA Diamond in the Stuff ~ A Glimpse InsideA Little Tipsy ~ At Home With K ~ Between Naps on the PorchBlue Cricket Design ~ Chic on a Shoestring ~ Coastal Charm ~ Confessions of a Stay At Home Mommy ~ Craft-O-Maniac ~ Debbie Does Creations ~ Delightful OrderDIY by Design ~ DIY Show Off ~ Elizabeth & Co. ~ Handy Man, Crafty Woman ~ home happy home ~ Home Savvy A to ZHomemaker on a Dime ~ homework ~ House of HepworthsHow To Nest for Less ~ I Gotta Create!It's OverflowingMy 1929 CharmerMy Girlish Whims ~ My Uncommon Slice of Suburbia ~ Positively Splendid ~ RadCrafterSassy Sites! ~ Savvy Southern Style ~ Serendipity and Spice ~ Sew Many Ways ~ Sugar and Dots ~ Sugar Bee Crafts ~ The 36th Avenue ~ The Blackberry Vine ~ The NY Melrose Family ~ The Project Queen ~ The Southern InstituteThrifty 101Under The Table and Dreaming
Tip Junkie handmade projects


Pin It

Friday, March 16, 2012

Friday Favorites #2

Here are some of my favorite things I've pinned at Pinterest lately.
I've added the links to their original sources below the photos.


This is such a romantic bedroom. Pink and green are one of my favorite color combinations. I love the gorgeous floral pattern on the bedding, and the headboard with curtains is to die for. Seriously thinking of doing something similar for my bed since I have no headboard at all. I also love the green wall color...and well just everything about this room.
 
~~~~~~~~~~

I would absolutely LOVE to have the imagination to come up with adorable cards like this, and this one is just the sweetest thing I've ever seen. The little embossed fence is so delicate, and the little birdies are so simple and cute. I just want to hug this card.
Betsy 
~~~~~~~~~~

For a long while I collected and decorated my kitchen in a 1950's theme. It was pink, aqua and yellow. I bought a lot of stuff off of Ebay to display in my kitchen. I used to love to look through old magazines that showed retro housewives and the homes they lived it. I still have days when I wish I lived in the 50's and 60's....and this dress brought back that longing. This is THE dress I would have worn to my prom.
1950's Party Dress 
~~~~~~~~~~

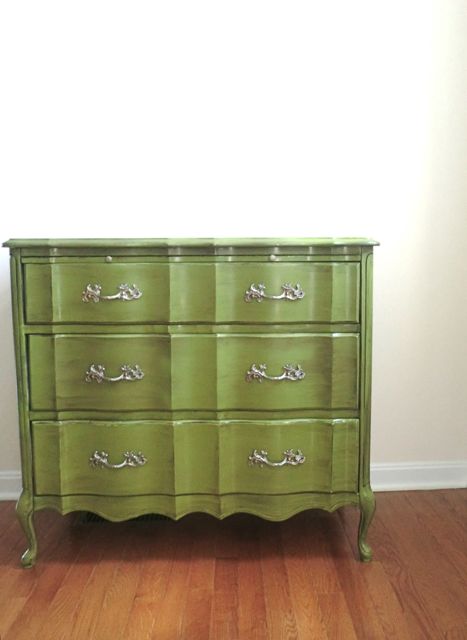
I have yet to refinish a piece of furniture. After looking at so many amazing transformations on people's blogs, I really want to try my hand at it. I have an old dresser in my bedroom that has been partially sanded forever, and when I get up enough courage, I will refinish it...this color. I for sure need green furniture somewhere in my house.
green french provincial dresser 
~~~~~~~~~~

Just the sweetest looking thing. I love French country decor..it's so soft and romantic and feminine looking.
French style dining room 
~~~~~~~~~~~

I love this idea for a gallery wall. You could use several different things...coordinating scrapbook papers, quilt pieces, handkerchiefs, fabric squares, book pages. Then just frame them with similar frames.
frame an antique quilt, tablecloth, or other fabric... This would look great in your house. I would use bigger frames though. 
~~~~~~~~~~

This is a project that is on my to-do list. You could used any size blocks..even a 2x4 cut into pieces would work, and can be customized for any kind of decor....a child's room, kitchen, a mantel, a bookshelf...just about anywhere.
Custom DIY Wooden Blocks 
~~~~~~~~~~

Such a cute idea for an old window! 
Birds in the window 
~~~~~~~~~~

I see a lot of jewelry and stuff made out of sea glass, and I always wondered.....do people really find this much of it on the beach? Or do they make it using colored glass and a rock tumbler? Anyway..this is so beautiful...I love the colors, and the intricate wire work.
 Seahorse pendant out of sea glass and wire
~~~~~~~~~~~

Here is a great idea that I want to try. Would love to do laundry for only a nickel a load!
Make your own laundry soap. 
~~~~~~~~~~

So those are my favorites this week. If you pin something, please visit the original source.
Have a wonderful weekend, and thanks for stopping by.
Please feel free to leave me a comment, I love hearing from you!


Pin It

Monday, March 12, 2012

Good Old War


It seems like every time I pick up my Ipod, before I play anything else, I listen to a few songs from Good Old War. And sing. Loudly. When no one is around.

File:Goodoldwar img13.jpg

Good Old War is an indie/indie folk band from Philadelphia. Members are Keith Goodwin, Daniel Schwartz, and Tim Arnold. The band's name comes from the last names of the three members;
 Goodwin for Good, Arnold for Old, and Schwartz for War.

They have been around since 2008, but it wasn't until recently when I was browsing the free mp3 downloads on Amazon that I came across them. I downloaded a couple songs and was hooked.

Here are a couple of my favorites:


Love these guys! :)

Linking up to:

Pin It

Sunday, March 11, 2012

Cookie Sheet Bulletin Board

A new project I worked on today...a cookie sheet bulletin board.

First, the inspiration for this came from a photo on Pinterest.
Click the link below the photo to be taken to the original source.

Here is what I used for this project: A cookie sheet, can of matte spray paint, drill, a piece of scrapbook paper, some little plastic and glass embellishments, homemade mod podge (1 cup Elmer's glue mixed with 1 cup water), glue dots, green ribbon.


The first thing I did was have my husband drill 2 holes in the top of the cookie sheet. The cookie sheet is 10 inches across, so he drilled a little hole at 3 inches and one at 7 inches.


I then lightly sanded the cookie sheet and sprayed a couple coats of the matte black on it.

After that was dry, I selected a piece of scrapbook paper that I wanted to use. I bought a book of papers at Walmart for only $5.00, and it contained 25 different patterns, with 2 sheets of each pattern.  The papers are 8.5 inches by 11 inches, and that looked to fit the cookie sheet just fine, so I didn't have to cut it to size at all. Cafe au Lait is the name of the book.

Using a 1-inch foam brush, I coated the back of the paper with the glue mixture, then placed it on the cookie sheet. I smoothed out as many bubbles as I could, then I added another coat of glue over the paper and let it dry for a couple hours.


I then cut two 8.5 inch lengths of Offray ribbon. The color is Spring Moss. I used glue dots to attach the ribbon at the top and bottom of the paper.

At the corners and middle of the ribbon where I used the glue dots, I used glue dots again to attach the little leaves in the corners and add the glass marbles.


After that I cut 2 lengths of the same green ribbon, maybe 12 to 14 inches long. For each length, I folded the end and threaded it through the eye of a large needle, and then threaded them through from back to front of each hole that was drilled. I knotted each side, leaving little 'tails' to stick out.
Working with the ribbon lengths at the back of the cookie sheet, I held both of them together, and just kind of eyeballed how long of a hanger I wanted, then knotted the ribbon. Then I tied a bow, and cut the ends of each, leaving them long enough to hang down a bit.


With some of the coordinating scrapbook papers I'm going to be making some magnets for this. Here is the completed bulletin board:


I really like the way this turned out. I would love to make another one, and use 3 different coordinating papers. Please feel free to leave a comment, and let me know what you think....I love hearing from you!

Have a wonderful day! :)

Linking to these parties:


Pin It

iPiccy Online Photo Editor

Since I've been taking more photos lately to post on my blog, I was in need of a photo editing site...one where I could resize, crop and tweak my photos.

I've also read on a lot of people's blogs how their beloved Picnik will no longer be available. Having never used Picnik, I can't compare to it, but what I have been using is very simple, has a wide variety of options for photos and doesn't require you to download anything.

I've been using iPiccy online photo editor, and so far I love it. Two things that I liked right away is first, like I said, it is very easy, and second...it doesn't change your original photo. Once you make changes, you name it, decide where to save it, and your original photo stays unchanged in it's original folder.

With iPiccy you can crop, resize, change hue and saturation, change and enhance colors, retouch, add text, and apply many different effects.

Below are some of the photo effects that can be achieved. I chose this photo because it has a lot of bright colors, and you can see what  kind of changes can be made to the human face.


Here is another photo, and I applied the HDR photo effect on it:


I'm still looking around for other photo editors, but for now this one has everything I need. I've also seen that people have been blogging about PicMonkey, but have not yet checked this one out.

Have you found something that you like better, something with more features? Let me know in a comment, I love hearing from you.

Have a great day!

Linking up to:


Pin It