Happy Monday everyone!
I'm so excited to show you the latest project I've been working on...I LOVE how it turned out!
A week or so ago, I took a trip to Goodwill. I blogged about what I found HERE.
One of the things I found was an old pedestal candle holder.
I wasn't sure what I wanted to do with it. I was going to paint and distress it, but I didn't have a candle for it on hand.
Then while I was looking on Pinterest one day, I saw this:

{source}
I thought this was such a cute idea, so I knew what I wanted to do with the candle pedestal.
Now what to use as the top?
I looked through my plates, and didn't have anything that I thought would have worked.
While looking through my cabinets to see if I had anything else that would work, I came across something that I had forgotten all about.
When we moved into my husband's mother's house, an old lazy susan was left behind. I used it for a while on my table, but some of the ball bearings had fallen out, so it was really wobbly, so I stuck it down in my cabinet and forgot about it.
This was perfect!
It's 14 inches across, and the wider base of the pedestal would be plenty to hold it up without it being tippy.
So here is what I started with:

I sanded both the pedestal and lazy susan, and primed it.

After priming, I had this:

When the primer was dry, I set the lazy susan on top of the pedestal, but where I would have had to glue it, one part was at an angle.

I told my husband that I thought that I needed to add a round piece to cover up the angled part of it....and that's when MY project turned into OUR project.
My husband found an old piece of paneling, and traced around the bottom of the lazy susan.

Then he started to rummage through the garage looking for his jigsaw, mumbling under his breath how old the saw was anyway and he should just run to the store to get a new one, and some different glue than I had originally bought for this project. Oh my.
So off he goes to the store. Comes home with a Black & Decker jigsaw and some new blades. He only paid $20 something for it. It's a cute little saw....one that I could probably use on future projects....so I bit my lip and didn't tell him that 'this is a trash to treasure project and the point is to make it using as little money as possible'.
He also bought something called Goop....explaining to me that the Elmer's Wood Glue that I originally bought for this project wouldn't really be the best thing. Ok. I nodded my head. Here is what he got:

I do have to say that this stuff really worked good. Probably way better than the Elmer's would have....so Elmer is sitting on a shelf now awaiting a future project with Mr. Black & Decker.
After he glued the pieces together, he drilled a hole through the circle so that the screw that holds it to the plate could go back in.
He also replaced the missing ball bearings, so that took care of the wobble that it had.
Apparently there are ball bearings on a bicycle somewhere, and we had an old one sitting in the yard so he took those off of that to replace them. THAT is something I would never have thought of..haha!
I originally was going to just use the plate and take spinning part off...but I'm glad that he was able to fix it because it's nice that it still is able to turn if I have it in a corner of my kitchen.
So here we have it all glued together. I gave it a couple hours for the glue to dry completely, then I primed the rest and let that dry.

After the primer was dry, I spray painted it.

I chose this Krylon Cherry Red color because it was the closest to the dark red accent pieces I want once the weather is warm enough to start my KITCHEN PROJECT.
It really is a gorgeous, shiny dark red....and went on very nicely.
I probably sprayed about 5 thin coats on the entire thing just to make sure I had good coverage in all of the nooks and crannies.
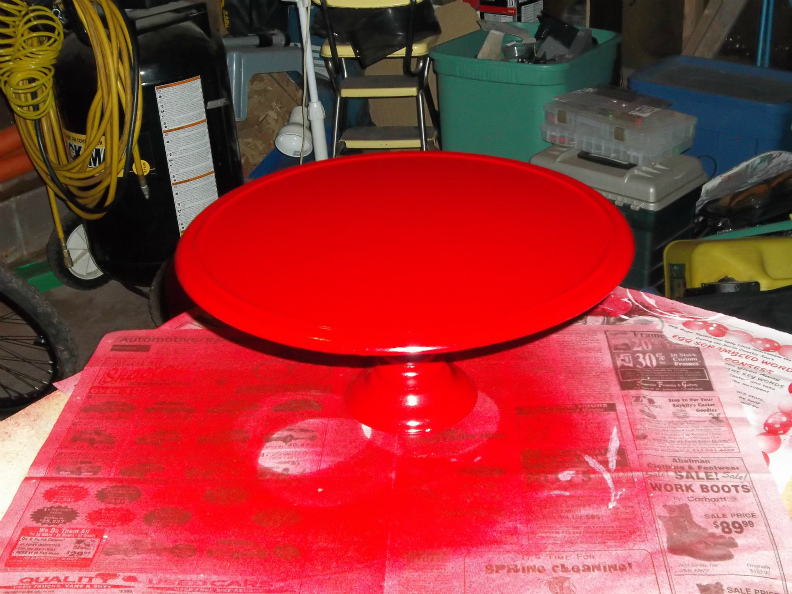
It looks like a horrible color in the above photo, but it really isn't as gaudy as it looks...haha!
Then I let it sit and dry for about a day.
So here are a few shots of the finished project. It matches NOTHING in my kitchen right now, so now I'm more anxious than ever to start painting and redoing my cabinets. :)
The jar candle in the photos is another little project that I blogged about HERE.


And one last old-time looking shot...just because it's fun to play around with Picnik.
I will miss it when it's gone. :(

So there we have it.
Not as inexpensive as I originally thought it would be...without the price of the new saw..haha...it probably cost about $20.
It was fun to put together, the two of us, and now I have a 'new' accent piece to put in my kitchen when it is done.
It's nice too, to know that I was able to take something old that my husband remembers his mom having from his childhood...even something as simple as a lazy susan...and being able to make it into something pretty and useful.
Thanks so much for stopping by to visit and see what I've been up to.
Please feel free to follow me through one of the options in my sidebar, and to leave a comment.
I would love to hear your opinions!
Have a wonderful day! :)
This post was featured by:


Linking to:
Monday
A Diamond in the Stuff ~ Between Naps on the Porch ~ Boogieboard Cottage ~ Brassy Apple ~ Cherished Handmade Treasures ~ C.R.A.F.T. ~ CraftOManiac ~ DIY Home Sweet Home ~ Home Savvy A to Z ~ Keeping It Simple ~ Lines Across My Face ~ Making The World Cuter ~ Our Delightful Home ~ Polly Want a Crafter ~ Sarahndipities ~ Serendipity and Spice ~ Sew Can Do ~ Singing Three Little Birds ~ Skip To My Lou ~ Sumo's Sweet Stuff ~ The Girl Creative ~ The Southern Institute
Tuesday
A Bowl Full of Lemons ~ At Home With K ~ Chef in Training ~ Cherished Bliss ~ Coastal Charm ~ Crafty Confessions ~ Debbie Does Creations ~ DIY By Design ~ Domestically Speaking ~ Elizabeth & Co. ~ Funky Polkadot Giraffe ~ Home Stories A to Z ~ Homework ~ House of Grace ~ How To Nest For Less ~ Kammy's Korner ~ Mommy By Day Crafter By Night ~ My Uncommon Slice of Suburbia ~ Not Just a Housewife ~ Nothing But Country ~ Sassy Sites! ~ Sugar Bee Crafts ~ Sweet Little Gals ~ The Blackberry Vine ~ The Lettered Cottage ~ The Project Queen ~ Tip Junkie ~ Today's Creative Blog ~ Vintage Wanna Bee
Wednesday
{Primp} ~ A Little Tipsy ~ Blue Cricket Design ~ Fabric Bows and More ~ Fireflies and Jellybeans ~ Gingersnap Crafts ~ Handy Man, Crafty Woman ~ Happy Hour Projects ~ Home Happy Home ~ I Gotta Create ~ Ivy and Elephants ~ Lil' Luna ~ My Girlish Whims ~ Night Owl Crafting ~ Oopsey Daisy ~ Polka Dots On Parade ~ Restore Interiors ~ Savvy Southern Style ~ seven thirty three ~ Sew Much Ado ~ Someday Crafts ~ Southern Lovely ~ Sugar and Dots ~ Tea Rose Room ~ The NY Melrose Family ~ The Sasse Life ~ The Trendy Treehouse ~ Vintage Gwen
Thursday
{aka} design ~ A Glimpse Inside ~ Bear Rabbit Bear ~ Brambleberry Cottage ~ Delightful Order ~ House of Hepworths ~ Just Winging It ~ live laugh rowe ~ Momnivore's Dilemma ~ My Repurposed Life ~ No Minimalist Here ~ RadCrafter ~ Saved by Suzy ~ School House Scraps ~ Somewhat Simple ~ The 36th Avenue ~ The CSI Project ~ Thrifty 101
Friday
2805 ~ 504 Main ~ Addicted 2 Decorating ~ At The Picket Fence ~ Blissful and Domestic ~ Chic On a Shoestring Decorating ~ Delicate Construction ~ Family Ever After ~ Finding My Way in Texas ~ Fingerprints On The Fridge ~ Five Days 5 Ways ~ French Country Cottage ~ Happy-Go-Lucky ~ Happy Hour Projects ~ Here Comes The Sun ~ Just A Girl ~ Kojo Designs ~ little becky homecky ~ love notes by lauryn ~ Momma's Kinds Crafty ~ Nap Time Crafters ~ One Artsy Mama ~ Sassy Sites ~ See Vanessa Craft ~ Serenity Now ~ Stuff and Nonsense ~ The Charm of Home ~ The Creative Paige ~ The Grant Life ~ The Rooste and the Hen ~ The Shabby Nest ~ Thirty Handmade Days ~ Tidy Mom ~ Whipperberry
Saturday
Be Different Act Normal ~ Funky Junk Interiors ~ Lolly Jane Boutique ~ Lovely Crafty Home ~ Positively Splendid ~ Six Sisters' Stuff ~ Young and Crafty
Sunday
Ask Anna ~ DIY Showoff ~ Flamingo Toes ~ Homemaker On A Dime ~ I Heart Nap Time ~ It's Overflowing ~ It's So Very Cheri ~ My 1929 Charmer ~ Nifty Thrifty Things ~ Petite Hermine ~ Randee's Organized Chaos ~ Sew Chatty ~ Sew Many Ways ~ Under The Table and Dreaming


This project turned out really nice, love how you took the old and turned it into new, and the color is beautiful!
ReplyDeleteI love it - what a great idea!
ReplyDeleteThis is such a great idea! I love the color you chose :)
ReplyDeleteGREAT idea!!! Totally love it!
ReplyDeleteWhat a fun little project! I think the color is great and I would love a lazy suzan like that, you'll get some good use out of it. Isn't it funny how a project changes and evolves (especially when the hubbies get involved) while you're doing it. I'm glad I'm not the only one that happens to. lol
ReplyDeleteThis is beautiful! And now you have a jigsaw and extra glue for future projects! Isn't it nice to have a hubby who will step in and help like that?!
ReplyDeleteI was just thinking the other day on how to make a cake frosting stand and this would be prefect for the job! Thanks!
ReplyDeleteAlways looking for ideas for flea market finds and this is a great idea and you could also use this for a guest room. Thanks
ReplyDeleteNeat idea. Thanks for sharing.
ReplyDeleteWhat a cool idea! I would love for you to share this with my Unveil Your Genius link party (new linky every Thursday).
ReplyDeletehttp://taylornorris.blogspot.com/2012/04/unveil-your-genius-link-party-5.html
Happy Thursday!
GREAT project!!!! What a creative idea to combine the two!
ReplyDeleteShannon
(www.akadesign.ca)
Wow. This was so meant to be. I was just trying to decide what to do with my extra lazy Susan. Fantastic idea!! Thanks for sharing at oopsey daisy!
ReplyDeleteSo cute!! I love the red! We'd love for you to share this at our party! http://housewivesofriverton.blogspot.com/2012/04/riverton-housewives-round-up-11.html
ReplyDeleteThis is great! I Love how it turned out. Thanks for sharing at Terrific Tuesdays.
ReplyDeleteRachel
adventuresofadiymom.blogspot.com
Love the red color! Great job, thanks for sharing
ReplyDeleteGreat idea...well executed. Thanks for sharing this. I may attempt it.
ReplyDeleteThank you for linking this up to Fantabulous Friday @ Little Becky Homecky!!
ReplyDeleteWhat a fun idea - I love red and think every kitchen could use some!
ReplyDeleteKelly
I'm impressed! Looks great, might use this as future inspiration for a project of my own :)
ReplyDeletePretty & practical. Great job!
ReplyDeletehappy monday, jackie...
ReplyDeletemy husband would have done the same thing. his workshop in the garage is a hot mess. i should submit him to HGTV...lol...
love the color. love your editing in picnik. never fear, between picasa and picmonkey you can accomplish the same thing. and they are both free...
i'm featuring you today from last week's creative juice party. i'm also sharing this at pinterest and facebook. thanks for linking up and have a lovely week!
This came out great. I love the color. Thanks so much for sharing at Whimsy Wednesdays!
ReplyDeleteThanks for linking up to the Creative Genius Link Party!
ReplyDeleteIt really turned out great! Love the color, Im so a color girl. It's really a fun project and it can be used for so many different reasons! Thanks for sharing your creative inspiration at Sunday's Best.
ReplyDeleteI like your cheery cherry-red project, Jackie. It must make you smile each time you see it. It would be a fun piece to use in decorative vignettes for holidays like July 4th, Christmas, and Valentine's Day. ;)
ReplyDeleteThanks for linking to Time Travel Thursday. I hope you'll join the fun this week, as well.
Blessings,
Liz @ The Brambleberry Cottage
I love your lazy susan pedestal! the color is yummy!
ReplyDeletegail
thanks for sharing at catch as catch can.
Love how it turned out! And even better that you and your husband worked on it together to make it just perfect. Thanks so much for sharing on Tout It Tuesday!
ReplyDelete