Happy Monday everyone!
I'm so excited to show you the latest project I've been working on...I LOVE how it turned out!
A week or so ago, I took a trip to Goodwill. I blogged about what I found
HERE.
One of the things I found was an old pedestal candle holder.
I wasn't sure what I wanted to do with it. I was going to paint and distress it, but I didn't have a candle for it on hand.
Then while I was looking on Pinterest one day, I saw this:
I thought this was such a cute idea, so I knew what I wanted to do with the candle pedestal.
Now what to use as the top?
I looked through my plates, and didn't have anything that I thought would have worked.
While looking through my cabinets to see if I had anything else that would work, I came across something that I had forgotten all about.
When we moved into my husband's mother's house, an old lazy susan was left behind. I used it for a while on my table, but some of the ball bearings had fallen out, so it was really wobbly, so I stuck it down in my cabinet and forgot about it.
This was perfect!
It's 14 inches across, and the wider base of the pedestal would be plenty to hold it up without it being tippy.
So here is what I started with:
I sanded both the pedestal and lazy susan, and primed it.
After priming, I had this:
When the primer was dry, I set the lazy susan on top of the pedestal, but where I would have had to glue it, one part was at an angle.
I told my husband that I thought that I needed to add a round piece to cover up the angled part of it....and that's when MY project turned into OUR project.
My husband found an old piece of paneling, and traced around the bottom of the lazy susan.
Then he started to rummage through the garage looking for his jigsaw, mumbling under his breath how old the saw was anyway and he should just run to the store to get a new one, and some different glue than I had originally bought for this project. Oh my.
So off he goes to the store. Comes home with a Black & Decker jigsaw and some new blades. He only paid $20 something for it. It's a cute little saw....one that I could probably use on future projects....so I bit my lip and didn't tell him that 'this is a trash to treasure project and the point is to make it using as little money as possible'.
He also bought something called Goop....explaining to me that the Elmer's Wood Glue that I originally bought for this project wouldn't really be the best thing. Ok. I nodded my head. Here is what he got:
I do have to say that this stuff really worked good. Probably way better than the Elmer's would have....so Elmer is sitting on a shelf now awaiting a future project with Mr. Black & Decker.
After he glued the pieces together, he drilled a hole through the circle so that the screw that holds it to the plate could go back in.
He also replaced the missing ball bearings, so that took care of the wobble that it had.
Apparently there are ball bearings on a bicycle somewhere, and we had an old one sitting in the yard so he took those off of that to replace them. THAT is something I would never have thought of..haha!
I originally was going to just use the plate and take spinning part off...but I'm glad that he was able to fix it because it's nice that it still is able to turn if I have it in a corner of my kitchen.
So here we have it all glued together. I gave it a couple hours for the glue to dry completely, then I primed the rest and let that dry.
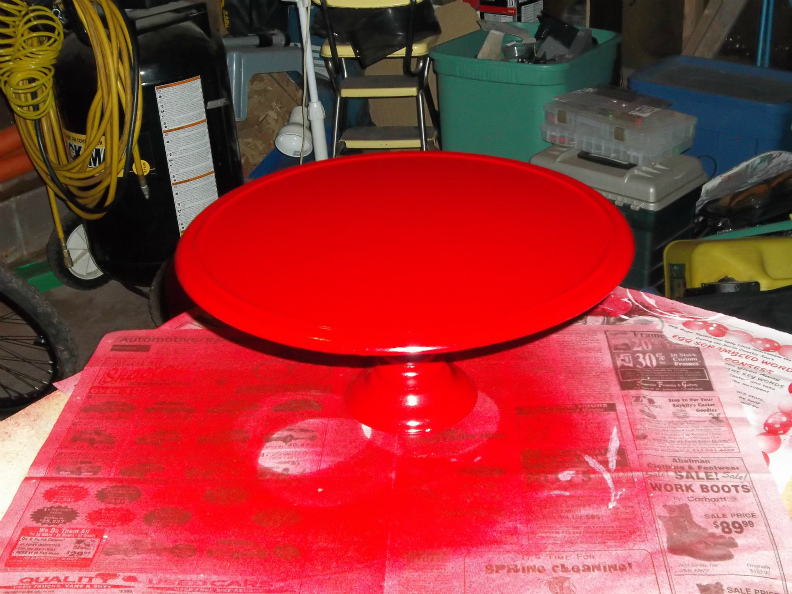
After the primer was dry, I spray painted it.
I chose this Krylon Cherry Red color because it was the closest to the dark red accent pieces I want once the weather is warm enough to start my
KITCHEN PROJECT.
It really is a gorgeous, shiny dark red....and went on very nicely.
I probably sprayed about 5 thin coats on the entire thing just to make sure I had good coverage in all of the nooks and crannies.
It looks like a horrible color in the above photo, but it really isn't as gaudy as it looks...haha!
Then I let it sit and dry for about a day.
So here are a few shots of the finished project. It matches NOTHING in my kitchen right now, so now I'm more anxious than ever to start painting and redoing my cabinets. :)
The jar candle in the photos is another little project that I blogged about
HERE.
And one last old-time looking shot...just because it's fun to play around with Picnik.
I will miss it when it's gone. :(
So there we have it.
Not as inexpensive as I originally thought it would be...without the price of the new saw..haha...it probably cost about $20.
It was fun to put together, the two of us, and now I have a 'new' accent piece to put in my kitchen when it is done.
It's nice too, to know that I was able to take something old that my husband remembers his mom having from his childhood...even something as simple as a lazy susan...and being able to make it into something pretty and useful.
Thanks so much for stopping by to visit and see what I've been up to.
Please feel free to follow me through one of the options in my sidebar, and to leave a comment.
I would love to hear your opinions!
Have a wonderful day! :)
This post was featured by:
Linking to: