Showing posts with label Trash to Treasure. Show all posts

Tuesday, May 1, 2012

April 2012 Recap

Hi everyone!

I can't believe that it's May already....it just seems like I was celebrating my daughter's 18th birthday on April 5th, and now the whole month is over already?

Here's what I was up to in April, in case you missed anything.


I posted detailed cleaning lists for the bedroom, living room and dining room.
(I still need to post the detailed list for the kitchen, which will be one day this week, so check back)


Sterilite 12-Quart Dish Pan, Red,12-Pack
I shared a little tip on how to hide your dirty dishes.


I showed how I took an old lazy susan and a candle holder and made a 'new' accent piece for my kitchen.


I turned a thrifted spice rack into a cute set of vases.


I updated a bottle of vanilla with a reused bottle and a printed label.


Our Grass Is The Greenest illustrated Art Print
I won the cutest art print in a giveaway.


I made some cute shaped soaps using cookie cutters and bar soap from the dollar store.

I'm hoping to have more to blog about this month, as my husband and I have started our kitchen makeover, and I've been taking lots of photos of the progress.

Have a great week!


Pin It

Monday, April 9, 2012

Upcycled Spice Rack into Vases

Happy Monday everyone!

Today I'm going to show you how I repurposed a thrifted spice rack into a cute set of vases.
This was a very simple little project, but I think it turned out really cute.

While I was at Goodwill the other day, I spotted this little spice rack for $1.99. 

This was a 'new' set...and by new I mean that each of the spice jars still had plastic around the cork stoppers, so it was used as a decorative piece by it's previous owner.
BUT....after getting it home and opening each jar...well when I went to dump out the spices, they were all stuck inside the jars, and I had to take a bamboo skewer and poke around inside of them to loosen everything enough for it to come out. The parsley had actually turned a bright yellow it was so old. Ew..haha!

Anyway, after I got all of the spices out, I soaked the bottles in hot soapy water. I used an old toothbrush to clean the insides. The labels and glue, after soaking, slide right off which was nice, so I didn't have to pick at everything to get it to come off.


The rack itself is metal, and is heavy and sturdy....but it was a sort of brownish/gray color that I didn't like, and had some sort of metallic paint on the leaves.
I took it into the garage and sprayed it with a coat of my matte black spray paint, which made it look cleaner and much better.


Now for the cork stoppers. Each stopper was different, depicting what was in each jar. I didn't want to refill it with the same kind of spices, and considered just painting all of the stoppers one color, but that wouldn't have looked right. Also, the one that was used for the garlic smelled SO strong I don't think I would have ever gotten the odor out. 


So I put the empty jars in the rack and left it out on my counter for a few days until I decided what I wanted to do with it.


Then I was reading some blogs that I follow one day, and I saw this awesome idea on My Simple Country Life's blog:
Upcycled Wood Frame Wall Flower Vase at My Simple Country Life

Then it hit me....I don't have to use my jars for spices...I can use them as vases! I've seen people use all shapes and sizes of bottles and jars as vases, and really love how they look.

I immediately thought that one single flower in each one would look great, but since our weather has not yet warmed up...there aren't any flowers in sight. So what I did was just clip little sprigs of some artificial things that I had in other vases and things. I do like the green, but these will be nice when I want to add a pop of color to my kitchen and can add some brightly colored flowers.

I also considered adding some decoupage labels on the bottles, possible some vintage French perfume labels or something, but I do like just them clear as well. 

So here is my finished project. Total cost - $1.99
And another accent piece to use once I finish my kitchen painting project.


I just love this!
Here is a before and after shot....what a difference a little paint and cleaning up can make!

Thank you all for stopping by to take a look at what I've been up to.
Please feel free to follow me so you can come back again to see what other junk I've been up to. ;)
Also, I love to hear from you, so please lave a comment and let me know what you think!

Have a wonderful day!  :)

This post was featured here:
Reduce, Reuse, UPcycle

My entry into Fridays Unfolded sponsored 
by Appliances Online and Bosch Washing Machines


Linking to these parties:
Monday
A Diamond in the Stuff ~ Between Naps on the Porch ~ Boogieboard Cottage ~ Brassy Apple ~ Cherished Handmade Treasures ~ C.R.A.F.T. ~ CraftOManiac ~ DIY Home Sweet Home ~ Home Savvy A to Z ~ Keeping It Simple ~ Lines Across My Face ~ Making The World Cuter ~ Our Delightful Home ~ Polly Want a Crafter Sarahndipities ~ Serendipity and Spice ~ Sew Can Do ~ Singing Three Little Birds ~ Skip To My Lou ~ Sumo's Sweet Stuff ~ The Girl Creative ~ The Southern Institute
Tuesday
A Bowl Full of Lemons ~ Adventures of a DIY Mom ~ At Home With K ~ Chef in Training ~ Cherished Bliss ~ Coastal Charm ~ Crafty Confessions ~ Debbie Does Creations ~ DIY By Design ~ Elizabeth & Co. ~ Funky Polkadot Giraffe ~ Home Stories A to Z ~ Homework ~ House of Grace ~ How To Nest For Less ~ Kammy's Korner ~ Mommy By Day Crafter By Night ~ My Uncommon Slice of Suburbia ~ Not Just a Housewife ~ Nothing But Country ~ Sassy Sites! ~ Sugar Bee Crafts ~ Sweet Little Gals ~ The Blackberry Vine ~ The Lettered Cottage ~ The Project Queen ~ The REAL Housewives of Riverton ~ Tip Junkie ~ Today's Creative Blog ~ Vintage Wanna Bee
Wednesday
{Primp} ~ A Little Tipsy ~ Blue Cricket Design ~ Cheap Crafty Mama ~ Fabric Bows and More ~ Fireflies and Jellybeans ~ Gingersnap Crafts ~ Handy Man, Crafty Woman ~ Happy Hour Projects ~ Home Happy Home ~ I Gotta Create ~ Ivy and Elephants ~ Lil' Luna ~ My Girlish Whims ~ Night Owl Crafting ~ Oopsey Daisy ~ Polka Dots On Parade ~ Restore Interiors ~ Savvy Southern Style ~ seven thirty three ~ Sew Much Ado ~ Someday Crafts ~ Southern Lovely ~ Sugar and Dots ~ Tea Rose Room ~ The NY Melrose Family ~ The Sasse Life ~ The Trendy Treehouse ~ Vintage Gwen
Thursday
{aka} design ~ A Glimpse Inside ~ Bear Rabbit Bear ~ Brambleberry Cottage ~ Delightful Order ~ House of Hepworths ~ Just Winging It ~ live laugh rowe ~ Momnivore's Dilemma ~ My Repurposed Life ~ No Minimalist Here ~ RadCrafter ~ Saved by Suzy ~ School House Scraps ~ Somewhat Simple ~ The 36th Avenue ~ The CSI Project ~ Thrifty 101
Friday
2805 ~ 504 Main ~ Addicted 2 Decorating ~ At The Picket Fence ~ Blissful and Domestic ~ Chic On a Shoestring Decorating ~ Delicate Construction ~ Family Ever After ~ Finding My Way in Texas ~ Fingerprints On The Fridge ~ Five Days 5 Ways ~ French Country Cottage ~ Happy-Go-Lucky ~ Happy Hour Projects ~ Here Comes The Sun ~ Just A Girl ~ Kojo Designs ~ little becky homecky ~ love notes by lauryn ~ Momma's Kinds Crafty ~ Nap Time Crafters ~ One Artsy MamaRemodelaholic ~ Sassy Sites ~ See Vanessa Craft ~ Serenity Now ~ Stuff and Nonsense ~ The Charm of Home ~ The Creative Paige ~ The Grant Life ~ The Rooster and the Hen ~ The Shabby Nest ~ Thirty Handmade Days ~ Tidy Mom ~ Whipperberry
Saturday
Be Different Act Normal ~ Funky Junk Interiors ~ Lolly Jane Boutique ~ Lovely Crafty Home ~ Positively Splendid ~ Six Sisters' Stuff ~ Young and Crafty
Sunday
Ask Anna ~ DIY Showoff Flamingo Toes ~ Homemaker On A Dime ~ I Heart Nap Time ~ It's Overflowing ~ It's So Very Cheri ~ My 1929 Charmer ~ Nifty Thrifty Things ~ Petite Hermine ~ Randee's Organized Chaos ~ Sew Chatty ~ Sew Many Ways ~ Under The Table and Dreaming


Pin It

Monday, April 2, 2012

Lazy Susan Pedestal

Happy Monday everyone!
I'm so excited to show you the latest project I've been working on...I LOVE how it turned out!

A week or so ago, I took a trip to Goodwill. I blogged about what I found HERE.
One of the things I found was an old pedestal candle holder. 
I wasn't sure what I wanted to do with it. I was going to paint and distress it, but I didn't have a candle for it on hand.

Then while I was looking on Pinterest one day, I saw this:

I thought this was such a cute idea, so I knew what I wanted to do with the candle pedestal. 

Now what to use as the top?
I looked through my plates, and didn't have anything that I thought would have worked. 
While looking through my cabinets to see if I had anything else that would work, I came across something that I had forgotten all about.

When we moved into my husband's mother's house, an old lazy susan was left behind. I used it for a while on my table, but some of the ball bearings had fallen out, so it was really wobbly, so I stuck it down in my cabinet and forgot about it.
This was perfect!
It's 14 inches across, and the wider base of the pedestal would be plenty to hold it up without it being tippy.
So here is what I started with:

I sanded both the pedestal and lazy susan, and primed it.


After priming, I had this:

When the primer was dry, I set the lazy susan on top of the pedestal, but where I would have had to glue it, one part was at an angle. 


I told my husband that I thought that I needed to add a round piece to cover up the angled part of it....and that's when MY project turned into OUR project.

My husband found an old piece of paneling, and traced around the bottom of the lazy susan.

Then he started to rummage through the garage looking for his jigsaw, mumbling under his breath how old the saw was anyway and he should just run to the store to get a new one, and some different glue than I had originally bought for this project. Oh my. 

So off he goes to the store. Comes home with a Black & Decker jigsaw and some new blades. He only paid $20 something for it. It's a cute little saw....one that I could probably use on future projects....so I bit my lip and didn't tell him that 'this is a trash to treasure project and the point is to make it using as little money as possible'. 
He also bought something called Goop....explaining to me that the Elmer's Wood Glue that I originally bought for this project wouldn't really be the best thing. Ok. I nodded my head. Here is what he got:

I do have to say that this stuff really worked good. Probably way better than the Elmer's would have....so Elmer is sitting on a shelf now awaiting a future project with Mr. Black & Decker.

After he glued the pieces together, he drilled a hole through the circle so that the screw that holds it to the plate could go back in.

He also replaced the missing ball bearings, so that took care of the wobble that it had.
Apparently there are ball bearings on a bicycle somewhere, and we had an old one sitting in the yard so he took those off of that to replace them. THAT is something I would never have thought of..haha!
I originally was going to just use the plate and take spinning part off...but I'm glad that he was able to fix it because it's nice that it still is able to turn if I have it in a corner of my kitchen.

So here we have it all glued together. I gave it a couple hours for the glue to dry completely, then I primed the rest and let that dry.


After the primer was dry, I spray painted it.


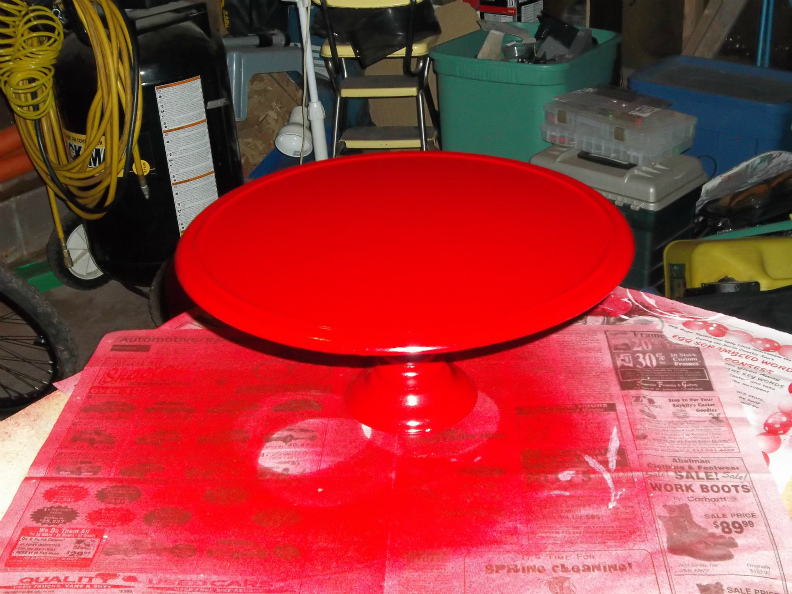
I chose this Krylon Cherry Red color because it was the closest to the dark red accent pieces I want once the weather is warm enough to start my KITCHEN PROJECT.

It really is a gorgeous, shiny dark red....and went on very nicely.
I probably sprayed about 5 thin coats on the entire thing just to make sure I had good coverage in all of the nooks and crannies.

It looks like a horrible color in the above photo, but it really isn't as gaudy as it looks...haha!
Then I let it sit and dry for about a day.

So here are a few shots of the finished project. It matches NOTHING in my kitchen right now, so now I'm more anxious than ever to start painting and redoing my cabinets. :)

The jar candle in the photos is another little project that I blogged about HERE.


And one last old-time looking shot...just because it's fun to play around with Picnik. 
I will miss it when it's gone.  :(


So there we have it.
Not as inexpensive as I originally thought it would be...without the price of the new saw..haha...it probably cost about $20. 
It was fun to put together, the two of us, and now I have a 'new' accent piece to put in my kitchen when it is done.

It's nice too, to know that I was able to take something old that my husband remembers his mom having from his childhood...even something as simple as a lazy susan...and being able to make it into something pretty and useful.

Thanks so much for stopping by to visit and see what I've been up to.
Please feel free to follow me through one of the options in my sidebar, and to leave a comment.
I would love to hear your opinions!

Have a wonderful day!  :)

This post was featured by:
Photobucket    

Linking to:
Monday
A Diamond in the Stuff ~ Between Naps on the Porch ~ Boogieboard Cottage ~ Brassy Apple ~ Cherished Handmade Treasures ~ C.R.A.F.T. ~ CraftOManiac ~ DIY Home Sweet Home ~ Home Savvy A to Z ~ Keeping It Simple ~ Lines Across My Face ~ Making The World Cuter ~ Our Delightful Home ~ Polly Want a Crafter Sarahndipities ~ Serendipity and Spice ~ Sew Can Do ~ Singing Three Little Birds ~ Skip To My Lou ~ Sumo's Sweet Stuff ~ The Girl Creative ~ The Southern Institute
Tuesday
A Bowl Full of Lemons ~ At Home With K ~ Chef in Training ~ Cherished Bliss ~ Coastal Charm ~ Crafty Confessions ~ Debbie Does Creations ~ DIY By Design ~ Domestically SpeakingElizabeth & Co. ~ Funky Polkadot Giraffe ~ Home Stories A to Z ~ Homework ~ House of Grace ~ How To Nest For Less ~ Kammy's Korner ~ Mommy By Day Crafter By Night ~ My Uncommon Slice of Suburbia ~ Not Just a Housewife ~ Nothing But Country ~ Sassy Sites! ~ Sugar Bee Crafts ~ Sweet Little Gals ~ The Blackberry Vine ~ The Lettered Cottage ~ The Project Queen ~ Tip Junkie ~ Today's Creative Blog ~ Vintage Wanna Bee
Wednesday
{Primp} ~ A Little Tipsy ~ Blue Cricket Design ~ Fabric Bows and More ~ Fireflies and Jellybeans ~ Gingersnap Crafts ~ Handy Man, Crafty Woman ~ Happy Hour Projects ~ Home Happy Home ~ I Gotta Create ~ Ivy and ElephantsLil' Luna ~ My Girlish Whims ~ Night Owl Crafting ~ Oopsey Daisy ~ Polka Dots On Parade ~ Restore InteriorsSavvy Southern Style ~ seven thirty three ~ Sew Much Ado ~ Someday Crafts ~ Southern Lovely ~ Sugar and Dots ~ Tea Rose Room ~ The NY Melrose Family ~ The Sasse Life ~ The Trendy Treehouse ~ Vintage Gwen
Thursday
{aka} design ~ A Glimpse Inside ~ Bear Rabbit Bear ~ Brambleberry Cottage ~ Delightful Order ~ House of Hepworths ~ Just Winging Itlive laugh rowe ~ Momnivore's Dilemma ~ My Repurposed Life ~ No Minimalist Here ~ RadCrafter ~ Saved by Suzy ~ School House Scraps ~ Somewhat Simple ~ The 36th Avenue ~ The CSI Project ~ Thrifty 101
Friday
2805 ~ 504 Main ~ Addicted 2 Decorating ~ At The Picket Fence ~ Blissful and Domestic ~ Chic On a Shoestring Decorating ~ Delicate Construction ~ Family Ever After ~ Finding My Way in Texas ~ Fingerprints On The Fridge ~ Five Days 5 Ways ~ French Country Cottage ~ Happy-Go-Lucky ~ Happy Hour Projects ~ Here Comes The Sun ~ Just A Girl ~ Kojo Designs ~ little becky homecky ~ love notes by lauryn ~ Momma's Kinds Crafty ~ Nap Time Crafters ~ One Artsy Mama ~ Sassy Sites ~ See Vanessa Craft ~ Serenity Now ~ Stuff and Nonsense ~ The Charm of Home ~ The Creative Paige ~ The Grant Life ~ The Rooste and the Hen The Shabby Nest ~ Thirty Handmade Days ~ Tidy Mom ~ Whipperberry
Saturday
Be Different Act Normal ~ Funky Junk Interiors ~ Lolly Jane Boutique ~ Lovely Crafty Home ~ Positively Splendid ~ Six Sisters' Stuff ~ Young and Crafty
Sunday
Ask Anna ~ DIY Showoff Flamingo Toes ~ Homemaker On A Dime ~ I Heart Nap Time ~ It's Overflowing ~ It's So Very Cheri ~ My 1929 Charmer ~ Nifty Thrifty Things ~ Petite Hermine ~ Randee's Organized Chaos ~ Sew Chatty ~ Sew Many Ways ~ Under The Table and Dreaming


Pin It

Friday, March 30, 2012

Top 5 Posts for March

I have had so much fun blogging this past month, and I'm so thankful to each of you who took a minute to stop by and visit and see what I was up to.  ;)
Here are my 5 most popular posts for the month of March:


And my most popular post from March was the following:


Again...I'm so thrilled that so many people have stopped by to see what I've been posting about. I can't wait to see what April will bring. I have a lot of ideas that I want to blog about, as well as quite a few projects that I want to work on, so I do hope you will come back to visit me soon. I invite everyone to follow me by one or more of the options in my sidebar.

Have a wonderful day everyone! :)


Pin It

Thursday, March 22, 2012

Words in Mini Frames

Hi everyone!
Well I was going to do a little project this weekend, but I was anxious to see how it would turn out, so this is how I spent my afternoon today.

I blogged here about my trip to Goodwill this morning, and how I found these 5 cute little mini frames:

Three of them were 50 cents, and two were 25 cents...so $2.00 total for the 'set'.

The inspiration for doing this craft came from seeing this adorable Mini Framed Spring post on Courtney's blog, A Diamond in the Stuff:
 
So cute, right?

Well I decided that I wanted to make my own version, but it wasn't until I got home that I realized that I had only gotten 5 frames. I tried to think of another word that I could use...but nothing came to mind. Until I remember that my last name had 5 letters..ha!

The first thing I did was to disassemble them. I took the frames into my disaster area of a garage, and spray painted them all with a matte black spray paint:

I already had the spray paint from other projects...so this cost me nothing.
It took 2 thin coats to cover them completely.

While the frames were drying, I cleaned up the glass for each of them, and using Picnik, decided what fonts to use for each of the letters.

Here are the frames all freshly painted. I'm not sure why, but I really prefer a matte black finish for frames instead of a glossy coat.
The frames dried nicely and covered well, except for the one I dropped on the floor while bringing them into my kitchen to work at my counter. (I really need a crafting space/area). The one I dropped landed just right so there was a tiny area on one corner that the paint got scuffed off, so I had go BACK into the garage and fix it...all the while mumbling and cursing.


When I made the Cookie Sheet Bulletin Board, I had gone to Walmart and bought a book of scrapbook paper, so I got that out, and chose 5 different patterns of paper that I wanted to use. Again, this was no cost since it was something I already had.

As I said earlier, I used Picnik to choose which fonts I wanted to use for the letters, and I printed out a different letter on each piece of paper. (I really need a Cricut) Then using the glass from each frame as a guide, I cut out the letters using a utility knife.

Notice how crooked the edges are? I can't cut paper.

I mean I can cut paper....I just can't cut it correctly. Ever.

It doesn't matter what I am cutting....even if I just put the scissors to the paper and make ONE cut.....it comes out crooked!! It's all curvy and wonky and looks like I flunked the cutting and pasting class in kindergarten. 
I know it MUST have something to do with my being left handed. There's simply no other explanation I can come up with. See how there is even a kind of grid patter on the paper above? Doesn't matter. And using the utility knife was an even bigger adventure. I know you're probably thinking.....left-handed scissors. Nope. After using normal scissors all my life, the expensive left-handed ones I have feel just horrible in my hand, and I do an even WORSE job with them, because the paper cuts on the opposite side of the blades. *sigh*

Ok enough of that. 

So after I have all of the letters printed and I schlep my way through the cutting process, I assemble all of the frames back together. Here is a close up of the first letter:

Again the total cost for this project was $2.00...what I paid for the frames. Everything else I used was something I already had.

I am planning on making one wall in my living room a gallery wall with family photos. I thought these little frames would look cute on a floating shelf somewhere mixed with the other, larger photos. For now though, for the sake of taking a photo of the finished project, they sit here on my kitchen shelf:


I like how they turned out, and when I find more little frames I might redo this for my grandson using brighter, bolder colors.

Thanks so much for stopping by to take a look. You are more than welcome to leave a comment, I love hearing from everyone.

Have a wonderful day!

Linking to:
{aka} design ~ 2805 ~ 30 Handmade DaysA bowl full of lemons ~ A Glimpse Inside ~ A Little TipsyAddicted 2 Decorating ~ At Home With KAt The Picket Fence ~ Be Different Act Normal ~ Between Naps on the PorchBoogieboard CottageBrassy Apple ~ Cherished Handmade TreasuresChic on a Shoestring Decorating ~ Coastal Charm ~ Confessions of a Stay At Home MommyC.R.A.F.T. ~ Craft-O-Maniac ~ Debbie Does CreationsDelightful Order ~ DIY by DesignDIY Showoff ~ Elizabeth & CoFingerprints on the Fridge ~ Fireflies and Jellybeans ~ Five Days 5 Ways ~ French Country Cottage ~ Funky Junk Interiors ~ Funky Polkadot Giraffe ~ Handy Man, Crafty WomanHappy Hour Projects ~ Here Comes the Sun ~ home happy homeHome Savvy A To Z ~ homeworkHouse of Hepworths ~ House of GraceI Gotta Create! ~ I Heart Nap Time ~ It All Started With PaintIt's Overflowing ~ It's So Very Cheri ~ Just a Party with My Peeps ~ Kammy's Korner ~ little becky homecky ~  live laugh rowe ~ love notes by laurynMy 1929 Charmer ~ My Girlish WhimsMy Repurposed Life ~ My Uncommon Slice of SuburbiaNo Minimalist Here ~ Not Just A HousewifeOne Artsy Mama ~ Our Delightful HomePetite HerminePositively SplendidRadCrafter ~ Randee's Organized ChaosSassy Sites! ~ Saved by Suzy ~ Savvy  ~ School House Scraps ~ Serendipity and SpiceSerenity Now ~ Sew Can DoSew Many Ways ~ Singing Three Little Birds ~ Skip To My LouSomeday Crafts ~ Southern LovelySouthern Style ~ Stuff and Nonsense ~ Sugar and DotsSugar Bee CraftsSumo's Sweet Stuff ~ Tea Rose HomeThe 36th Avenue ~ The Blackberry Vine ~ The Brambleberry CottageThe Charm of Home ~ The Girl CreativeThe Grant LifeThe NY Melrose Family ~ The Project QueenThe Southern InstituteThrifty 101 ~ Tip JunkieUnder The Table and DreamingVintage Gwen ~ Young and Crafty

Pin It